Product Description
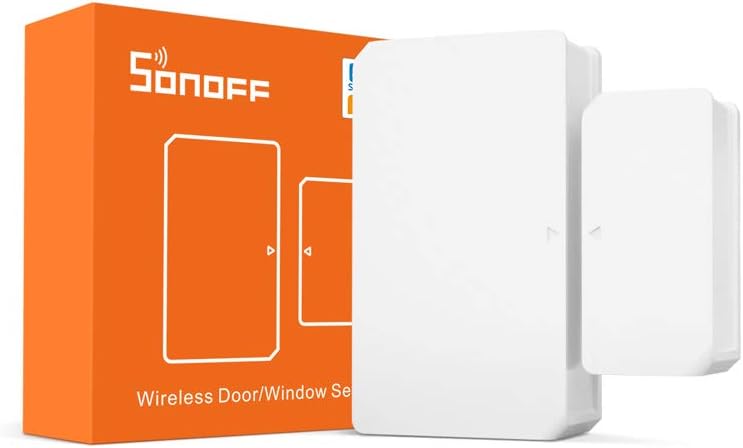
Elevate the security and automation of your smart home with the Sonoff Door Window Sensor. Crafted for simplicity and effectiveness, this wireless sensor employs Zigbee connectivity, ensuring seamless integration into your existing smart home ecosystem. Its primary function is clear: keeping your home secure. Easily affix the sensor to doors, windows, or any entry points, and enjoy real-time alerts on your connected devices whenever these points are opened or closed. The compact design and wireless nature of the sensor allow for discreet placement, ensuring your home’s security is fortified without compromising aesthetics. With its long-lasting battery life, compatibility with popular smart home platforms like Alexa and Google Home, the Sonoff Door Window Sensor is a smart investment in both peace of mind and home automation.
Reinforce the defense of your home with the Sonoff Door Window Sensor. This intuitive device is designed to provide instant alerts and notifications whenever doors or windows are opened or closed, adding an extra layer of security to your living space. The Zigbee connectivity guarantees smooth communication with your smart home hub, enabling seamless integration into your existing setup. Easy to install and with a compact form factor, this sensor discreetly fits into any part of your home. Benefit from the efficiency of long-lasting battery life, ensuring that your home stays protected with minimal maintenance. Compatible with popular smart home platforms like Alexa and Google Home, the Sonoff Door Window Sensor is a versatile and reliable choice for those seeking a smarter, more secure living environment.
Automation Ideas
The Sonoff Door and Window Sensor play a pivotal role in securing your home and enabling various automation scenarios. Here are some innovative automation ideas to harness the capabilities of this sensor:
- Security Alerts – Receive instant notifications when a door or window is opened unexpectedly by connecting the Sonoff Door and Window Sensor to your smart home platform (e.g., SmartThings, Home Assistant). Configure the platform to send real-time alerts to your smartphone whenever the sensor detects an unexpected opening.
- Smart Lighting Control – Automate lights to turn on when a door is opened and off when it’s closed using the Sonoff Door and Window Sensor. Integrate the sensor with your smart lighting system (e.g., Philips Hue, smart switches) through your chosen smart home platform. For example, in SmartThings, create an automation that activates lights upon detecting an open status and turns them off when the door is closed.
- Temperature Control – Conserve energy by adjusting the thermostat when a door or window is opened. Connect the Sonoff Sensor to your smart thermostat system (e.g., Nest, Ecobee) via your smart home platform. Create an automation, such as in Home Assistant, to modify the thermostat settings based on the sensor’s status, optimizing energy usage.
- Home/Away Modes – Automatically set your smart home in “Away” mode when doors or windows are closed and in “Home” mode when they are open. Program your smart home hub (e.g., SmartThings) to change modes based on the Sonoff Sensor status. For instance, create a routine that adjusts the mode according to the door or window sensor’s open or closed status.
- Pet Monitoring – Stay informed if a door or window is opened when you’re away, indicating a potential pet escape. Set up alerts through your smart home platform (e.g., SmartThings) to notify you when the Sonoff Sensor detects an open door or window during specific times when you’re typically not at home.
- Entryway Welcome – Create a welcoming scene by activating lights, adjusting the thermostat, or playing soft music when the front door is opened. Use the Sonoff Door and Window Sensor to trigger this customized automation through your smart home platform.
- Intruder Deterrent – Simulate home occupancy by triggering lights or sounds when a door is opened unexpectedly. Connect the sensor to a smart plug controlling lights or a smart speaker to play sounds, deterring potential intruders.
- Garage Door Monitoring – Check the status of your garage door from anywhere. Attach the Sonoff Sensor to your garage door and receive real-time updates on its open or closed status through your smart home platform.
- Energy Saving with HVAC – Adjust heating or cooling systems based on door or window status to save energy. Integrate the sensor with your smart thermostat or HVAC system, automatically optimizing energy consumption when doors or windows are opened.
- Customized Scenes – Create custom automation scenes for different times of the day. For example, during the evening, have the lights dim and your favorite music play when a specific door is opened. Utilize the Sonoff Sensor to trigger these personalized scenes.
Regularly test your automation routines to ensure they operate seamlessly, providing you with reliable security alerts and smart home conveniences. Keep the sensor’s battery in check to maintain its responsiveness. These automation suggestions not only enhance your home security but also bring a new level of intelligence to how you interact with your living space.
Setup
Home Assistant
Setting up a Sonoff Door and Window Sensor in Home Assistant involves a few steps. Before you begin, ensure that you have Home Assistant installed and running. Here’s a step-by-step guide:
- Connect the Sensor:
- Install the batteries in the Sonoff Door and Window Sensor.
- Place the sensor on the door or window you want to monitor.
- Pair the Sensor with Sonoff RF Bridge (if applicable):
- If you are using the Sonoff RF Bridge to connect the sensor to Home Assistant, make sure it is set up and connected to your network.
- Follow the Sonoff RF Bridge instructions to pair the sensor with the bridge.
- Enable MQTT in Sonoff Device:
- If your Sonoff device supports MQTT, you need to enable it.
- In the Sonoff device settings, configure the MQTT parameters, including the broker address, port, username, and password.
- Configure MQTT in Home Assistant:
- Open your Home Assistant configuration file (usually
configuration.yaml) in a text editor. - Add MQTT integration if not already done. Example configuration:yaml
- Open your Home Assistant configuration file (usually
mqtt:
  broker: YOUR_BROKER_IP_OR_HOSTNAME
  port: YOUR_BROKER_PORT
  username: YOUR_MQTT_USERNAME
  password: YOUR_MQTT_PASSWORD
5. Add Sonoff Sensor to Home Assistant:
- In your Home Assistant configuration file, add the Sonoff Door and Window Sensor as a binary sensor using MQTT. Example configuration:yaml
binary_sensor:
  - platform: mqtt
    state_topic: "sonoff/door_sensor/status"
    name: "Door Sensor"
    payload_on: "ON"
    payload_off: "OFF"
    device_class: door
6. Restart Home Assistant:
- Save your configuration file and restart Home Assistant to apply the changes.
7. Check Home Assistant Dashboard:
- Once Home Assistant has restarted, check your Home Assistant dashboard to see if the Sonoff Door and Window Sensor is correctly displaying the door state.
With these steps, you should have successfully set up the Sonoff Door and Window Sensor in Home Assistant. Remember to consult the specific documentation for your Sonoff device and Home Assistant version for any additional details or changes.
Amazon Alexa
Setting up a Sonoff Door and Window Sensor with Amazon Alexa directly involves the following steps:
- Install and Configure the Sensor:
- Install the batteries in the Sonoff Door and Window Sensor.
- Set up the sensor using the eWeLink app. Follow the manufacturer’s instructions to pair the sensor with the app.
- Enable eWeLink Skill in Alexa:
- Open the Alexa app on your mobile device.
- Navigate to the Skills & Games section.
- Search for “eWeLink” and enable the eWeLink skill.
- Link your eWeLink account with Alexa.
- Discover Devices:
- In the Alexa app, go to the Devices tab.
- Tap on the “+” icon to add a new device.
- Select “Add Device” and choose the category that corresponds to your Sonoff sensor (e.g., Door/Window Sensor).
- Alexa will discover the devices linked to your eWeLink account.
- Assign to Rooms (Optional):
- Organize your devices by assigning them to specific rooms in the Alexa app.
- Voice Control:
- You can now use voice commands with Alexa to check the status of your Sonoff Door and Window Sensor. For example, you might say, “Alexa, is the door open?”
By following these steps, you should be able to successfully set up your Sonoff Door and Window Sensor with Amazon Alexa using the eWeLink app. Be sure to refer to the specific instructions provided by Sonoff for your device for any additional details or updates.
Apple HomeKit
Setting up a Sonoff Door and Window Sensor with Apple HomeKit involves a few steps. Please note that the compatibility with HomeKit may vary depending on the specific Sonoff device model. Here is a general guide:
Using eWeLink App:
- Install and Configure the Sensor:
- Install the batteries in the Sonoff Door and Window Sensor.
- Set up the sensor using the eWeLink app. Follow the manufacturer’s instructions to pair the sensor with the app.
- Update Firmware (if necessary):
- Ensure that the firmware of your Sonoff device is updated to the latest version. This may include HomeKit compatibility updates.
- Enable HomeKit in eWeLink App:
- Open the eWeLink app.
- Go to the device settings for your Sonoff Door and Window Sensor.
- Look for an option to enable HomeKit integration.
- Follow the on-screen instructions to pair the device with HomeKit.
- Scan the HomeKit Code:
- During the setup process, you may be asked to scan the HomeKit code on your Sonoff device. This code is usually a QR code.
- Verify in Home App:
- Open the Apple Home app on your iOS device.
- Your Sonoff Door and Window Sensor should now appear in the Home app under the Rooms section.
- Assign to Rooms and Automations (Optional):
- Organize your devices by assigning them to specific rooms in the Home app.
- Create automations or scenes in the Home app that involve your Sonoff sensor.
- Voice Control with Siri:
- You can now use Siri voice commands to check the status of your Sonoff Door and Window Sensor. For example, you might say, “Hey Siri, is the door open?”
By following these steps, you should be able to integrate your Sonoff Door and Window Sensor with Apple HomeKit. Keep in mind that the specific steps may vary based on the model and firmware of your Sonoff device, so refer to the manufacturer’s instructions for any device-specific details.
Google Home
Setting up a Sonoff Door and Window Sensor with Google Home involves a few steps. Please note that the compatibility with Google Home may vary depending on the specific Sonoff device model. Here is a general guide:
- Install and Configure the Sensor:
- Install the batteries in the Sonoff Door and Window Sensor.
- Set up the sensor using the eWeLink app. Follow the manufacturer’s instructions to pair the sensor with the app.
- Update Firmware (if necessary):
- Ensure that the firmware of your Sonoff device is updated to the latest version. This may include Google Home compatibility updates.
- Enable Google Home in eWeLink App:
- Open the eWeLink app.
- Go to the device settings for your Sonoff Door and Window Sensor.
- Look for an option to enable Google Home integration.
- Follow the on-screen instructions to link the device with Google Home.
- Authorize eWeLink in Google Home App:
- Open the Google Home app on your mobile device.
- Tap on the “+” icon to add a new device.
- Choose “Set up device” and select “eWeLink Smart Home” as the provider.
- Log in with your eWeLink account credentials and authorize Google Home to access your devices.
- Sync Devices:
- Google Home will now sync with eWeLink to discover the connected devices, including your Sonoff sensor.
- Assign to Rooms and Create Routines (Optional):
- Organize your devices by assigning them to specific rooms in the Google Home app.
- Create routines or automations in the Google Home app that involve your Sonoff sensor.
- Voice Control with Google Assistant:
- You can now use voice commands with Google Assistant to check the status of your Sonoff Door and Window Sensor. For example, you might say, “Hey Google, is the door open?”
By following these steps, you should be able to integrate your Sonoff Door and Window Sensor with Google Home. Keep in mind that the specific steps may vary based on the model and firmware of your Sonoff device, so refer to the manufacturer’s instructions for any device-specific details.
eWeLink
To set up a Sonoff Door and Window Sensor in the eWeLink app, you can follow these steps:
- Install Batteries:
- Insert the batteries into the Sonoff Door and Window Sensor.
- Download eWeLink App:
- If you haven’t already, download and install the eWeLink app from the App Store (iOS) or Google Play Store (Android).
- Create eWeLink Account or Log In:
- Open the eWeLink app.
- Create a new eWeLink account or log in with your existing account.
- Add a Device:
- Tap the “+” icon in the eWeLink app to add a new device.
- Choose Zigbee Device Type:
- Select “Zigbee” as the device type since the Sonoff Door and Window Sensor operates on Zigbee.
- Enter Pairing Mode:
- Follow the on-screen instructions to put the Sonoff Door and Window Sensor into pairing mode. This usually involves pressing a button on the sensor.
- Scan QR Code (if applicable):
- Some devices may have a QR code that you need to scan during the pairing process. Follow the instructions if this is the case.
- Connect to Zigbee Bridge:
- If you have a Sonoff Zigbee Bridge, make sure it’s powered on and connected to your Wi-Fi network.
- The sensor should automatically connect to the Zigbee Bridge during the pairing process.
- Complete Setup:
- Follow the prompts in the eWeLink app to complete the setup process. This may include naming the device and assigning it to a room.
- Check Device Status:
- Once the setup is complete, check the eWeLink app to ensure that the Sonoff Door and Window Sensor is reporting its status correctly.
- Organize Devices:
- Optionally, you can organize your devices within the eWeLink app by assigning them to specific rooms.
Now, your Sonoff Door and Window Sensor should be successfully set up in the eWeLink app. If you encounter any issues or if there are specific device features, make sure to refer to the manufacturer’s instructions or the eWeLink app for additional guidance.
Other Resources
https://www.zigbee2mqtt.io/devices/SNZB-04.html
https://sonoff.tech/product/gateway-and-sensors/snzb-04/
