Product Description
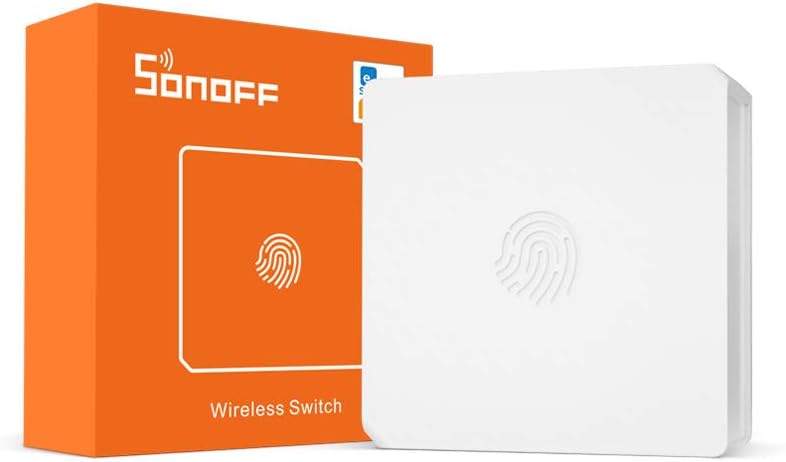
Transform your home into a smart haven with the Sonoff Wireless Switch. Designed for ultimate convenience and versatility, this wireless switch allows you to control your connected devices with just a tap. The Zigbee connectivity ensures seamless integration into your smart home ecosystem, offering reliable communication with other compatible devices. Whether you want to turn on the lights, activate a smart plug, or control any other connected appliance, the Sonoff Wireless Switch makes it effortless. Its compact and wireless design allows for easy installation in any part of your home, providing you with the flexibility to place it where it’s most convenient. With compatibility with popular smart home platforms like Alexa and Google Home, this wireless switch empowers you to create a personalized and responsive smart home environment tailored to your preferences.
Experience the freedom and simplicity of smart home control with the Sonoff Wireless Switch. Say goodbye to traditional switches and hello to the future of home automation. This intuitive switch operates wirelessly, eliminating the need for complex wiring. Zigbee connectivity ensures reliable and instant communication with your smart home hub, allowing you to effortlessly control your devices from anywhere in your home. Its user-friendly design and compatibility with popular voice assistants make it a perfect addition to any smart home setup. Upgrade your living space with the Sonoff Wireless Switch and enjoy the convenience of smart home control at your fingertips.
Automation Ideas
The Sonoff Wireless Switch is a versatile device for seamlessly controlling various aspects of your smart home. Here are some innovative automation ideas to maximize the functionality of this wireless switch:
- Smart Lighting Control – Automate lights to turn on or off using the Sonoff Wireless Switch. Integrate it with your smart lighting system (e.g., Philips Hue, smart switches) through your chosen smart home platform. For instance, create an automation that activates lights with a button press.
- Appliance Control – Connect the wireless switch to smart plugs or outlets to control appliances. Use it to turn on or off devices like coffee makers, fans, or space heaters with a simple button press.
- Scene Activation – Integrate the switch into your smart home scenes. For example, configure it to trigger a “Movie Night” scene that dims the lights and lowers the blinds when pressed.
- Security System Arm/Disarm – Use the switch to arm or disarm your smart security system. Assign specific actions to the button press, such as activating or deactivating motion detectors and cameras.
- Smart Doorbell – Configure the switch to act as a smart doorbell. Pressing the button could send notifications or activate a chime sound in your home.
- Emergency Alerts – Program the switch to send emergency alerts. For instance, a long press could trigger a message to be sent to a designated contact in case of distress.
- Guest Welcome – Set up a “Guest Welcome” scene. Pressing the switch when guests arrive could turn on pathway lights, adjust thermostat settings, and play a welcome message.
- Sleep Mode Activation – Use the switch to activate a “Sleep Mode” scene. Press it before bedtime to turn off lights, lower blinds, and set the thermostat to a comfortable sleep temperature.
- Kids’ Nightlight – Attach the switch to a smart plug controlling a nightlight in kids’ rooms. Pressing the button at bedtime could turn on a gentle nightlight for added comfort.
- Voice Assistant Interaction – Integrate the switch with voice assistants like Google Assistant or Amazon Alexa. Use it to trigger voice-activated commands or routines with a button press.
Remember to test your automation routines periodically to ensure they work as expected. Additionally, keep the switch’s battery in check to maintain its reliability. These automations not only enhance your convenience but also streamline the control of smart devices in your home. Tailor these ideas to suit your specific needs and enjoy the convenience of smart home living.
Setup
Home Assistant
Setting up a Sonoff Wireless Switch in Home Assistant involves integrating it with the eWeLink platform using the “eWeLink Smart Home” integration. Here are step-by-step instructions:
- Enable eWeLink Integration:
- Open your Home Assistant web interface.
- Navigate to “Configuration” and select “Integrations.”
- Click the “+” icon to add a new integration.
- Search for “eWeLink Smart Home” and follow the prompts to enable the integration.
- Authorize eWeLink Account:
- During the integration setup, you will be prompted to enter your eWeLink account credentials.
- Authorize Home Assistant to access your eWeLink devices.
- Discover Devices:
- After authorization, Home Assistant will attempt to discover your eWeLink devices, including the Sonoff Wireless Switch.
- Complete Setup:
- Follow the on-screen instructions to complete the setup process.
- Verify that the Sonoff Wireless Switch is listed among the discovered devices.
- Check Home Assistant Dashboard:
- Open your Home Assistant dashboard to ensure that the Sonoff Wireless Switch is visible and controllable.
- Customize Device Names (Optional):
- You can customize the name of the Sonoff Wireless Switch or assign it to a specific room by editing the device details in the Home Assistant web interface.
- Automations and Scripts (Optional):
- Create automations or scripts based on the state changes of the Sonoff Wireless Switch using the Home Assistant Automations or Scripts section.
By following these steps, you should be able to successfully set up your Sonoff Wireless Switch in Home Assistant using the eWeLink Smart Home integration. Keep in mind that the specific steps may vary based on updates to Home Assistant and the eWeLink integration, so refer to the official documentation for any changes or additional details.
Amazon Alexa
Setting up a Sonoff Wireless Switch with Amazon Alexa involves integrating it with the eWeLink Smart Home skill, as Sonoff devices are typically managed through the eWeLink platform. Here are step-by-step instructions:
- Open Alexa App:
- Launch the Amazon Alexa app on your mobile device.
- Enable eWeLink Smart Home Skill:
- Tap on the three horizontal lines in the top-left corner to open the menu.
- Select “Skills & Games” from the menu.
- Search for “eWeLink Smart Home” in the Skills search bar.
- Select the eWeLink Smart Home skill from the results.
- Link eWeLink Account:
- Click on “Enable” to enable the eWeLink Smart Home skill.
- Enter your eWeLink account credentials and follow the on-screen instructions to link your eWeLink account with Alexa.
- Discover Devices:
- After linking the accounts, Alexa will automatically discover the connected eWeLink devices, including the Sonoff Wireless Switch.
- Complete Setup:
- Follow any additional prompts to complete the setup process.
- Check Alexa Devices:
- Open the Alexa app and go to the Devices tab.
- Verify that the Sonoff Wireless Switch is listed among the discovered devices.
- Voice Control:
- You can now use voice commands with Alexa to control the Sonoff Wireless Switch. For example, you might say, “Alexa, turn on [Switch Name].”
By following these steps, you should be able to successfully set up your Sonoff Wireless Switch with Amazon Alexa using the eWeLink Smart Home skill. Keep in mind that specific steps may vary based on updates to the Alexa app or eWeLink skill, so refer to the respective documentation for any changes or additional details.
Apple HomeKit
Please note that setting up Homebridge and plugins may require some technical knowledge, and the steps provided here are general. Make sure to check for any updates or changes to the software and plugins.
- Install homebridge-ewelink-max Plugin:
- Install the “homebridge-ewelink-max” plugin by running the following command
npm install -g homebridge-ewelink-max
2. Configure the Plugin:
- Open the Homebridge configuration file (usually located at
~/.homebridge/config.json) in a text editor. - Add a new accessory configuration for your Sonoff Wireless Switch. Example configuration
- Replace “Sonoff Switch” with the desired name for your accessory.
- Replace “your-device-id” with the device ID of your Sonoff Switch (can be found in the eWeLink app).
- Replace “your-ewelink-api-key” with your eWeLink API key (can be obtained from your eWeLink account).
"accessories": [
  {
    "name": "Sonoff Switch",
    "type": "SonoffMAX",
    "device": "your-device-id",
    "api_key": "your-ewelink-api-key"
  }
]
3. Restart Homebridge:
- Restart the Homebridge service to apply the changes.
4. Add Accessory in Home App:
- Open the Apple Home app on your iOS device.
- Tap the “+” icon to add a new accessory.
- Select “Don’t Have a Code or Can’t Scan?” and choose the “Homebridge” accessory.
- Enter the Homebridge setup code (can be found in the Homebridge logs or configuration).
5. Complete Setup:
- Follow the on-screen instructions to complete the setup of the Sonoff Wireless Switch in Apple HomeKit.
After completing these steps, you should be able to control your Sonoff Wireless Switch using the Apple Home app and Siri. Keep in mind that this solution relies on the Homebridge platform, and the plugin may receive updates or changes, so refer to the respective documentation for any updates or additional details.
Google Home
Setting up a Sonoff Wireless Switch with Google Home involves integrating it with the eWeLink platform, as Sonoff devices are typically managed through the eWeLink app. Here are step-by-step instructions:
- Open Google Home App:
- Launch the Google Home app on your mobile device.
- Add eWeLink Account:
- Tap on the “+” icon in the top-left corner to add a new device.
- Select “Set up device” and choose “Have something already set up?”
- Search for “eWeLink” and select it from the list of available services.
- Link eWeLink Account:
- Log in with your eWeLink account credentials.
- Authorize Google Home to access your eWeLink devices.
- Discover Devices:
- After linking the accounts, Google Home will automatically discover the connected eWeLink devices, including the Sonoff Wireless Switch.
- Complete Setup:
- Follow any additional prompts to complete the setup process.
- Check Google Home Devices:
- Open the Google Home app and go to the Devices tab.
- Verify that the Sonoff Wireless Switch is listed among the discovered devices.
- Assign to Rooms (Optional):
- Organize your devices by assigning them to specific rooms in the Google Home app.
- Voice Control:
- You can now use voice commands with Google Assistant to control the Sonoff Wireless Switch. For example, you might say, “Hey Google, turn on [Switch Name].”
By following these steps, you should be able to successfully set up your Sonoff Wireless Switch with Google Home using the eWeLink integration. Keep in mind that specific steps may vary based on updates to the Google Home app or eWeLink service, so refer to the respective documentation for any changes or additional details.
eWeLink
Setting up a Sonoff Wireless Switch in the eWeLink app involves the following steps:
- Install eWeLink App:
- Download and install the eWeLink app from the App Store (iOS) or Google Play Store (Android).
- Open eWeLink App:
- Launch the eWeLink app on your mobile device.
- Create or Log in to eWeLink Account:
- Create a new eWeLink account if you don’t have one, or log in with your existing account.
- Add Device:
- Tap the “+” icon in the eWeLink app to add a new device.
- Select Device Type:
- Choose the device type you want to add. In this case, it’s a “Switch.”
- Enter Pairing Mode on the Sonoff Switch:
- Follow the instructions provided with the Sonoff Wireless Switch to put it into pairing mode. This often involves pressing a button on the device until the LED indicator blinks rapidly.
- Connect to Wi-Fi:
- Enter your Wi-Fi network credentials when prompted, and allow the app to connect the Sonoff Switch to your Wi-Fi network.
- Name the Device:
- Give your Sonoff Wireless Switch a name for easy identification in the app. This could be something like “Living Room Switch.”
- Complete Setup:
- Follow the on-screen instructions to complete the setup process.
- Test the Switch:
- Use the eWeLink app to test the Sonoff Wireless Switch. You should be able to turn it on and off using the app.
- Optional: Set Timers and Scenes:
- Explore the eWeLink app to set timers, schedules, or scenes for automation.
By following these steps, you should be able to successfully set up your Sonoff Wireless Switch in the eWeLink app. If you encounter any issues or need specific details based on the model of your Sonoff device, refer to the user manual provided with the switch or check the official documentation on the Sonoff website.
Other Resources
https://www.zigbee2mqtt.io/devices/SNZB-01.html
https://sonoff.tech/product/gateway-and-sensors/snzb-01/
